
Upgrading from carpet to hardwood flooring can completely change the look and feel of your home. It not only adds timeless elegance but also boosts the overall value and durability of the space. Whether you’re going for a cozy traditional vibe or a sleek modern design, hardwood floors offer a versatile foundation. The good news is that replacing carpet with hardwood is achievable for many homeowners, especially with a step-by-step approach that focuses on preparation, precision, and proper finishing. As flooring expert Jonathan Wolfe notes,
“A successful hardwood installation starts with solid subfloor preparation and ends with careful attention to finishing details.”
Why Replace Carpet with Hardwood?
Carpet may offer comfort, but it often traps allergens, stains easily, and wears out faster than hardwood. Hardwood floors not only last longer but are easier to clean and can make small spaces feel larger and more open. Additionally, they add a timeless quality that can complement nearly any interior design style. This investment can also increase your home’s resale value, making it a smart choice both aesthetically and financially.
Step-by-Step Process to Replace Carpet with Hardwood
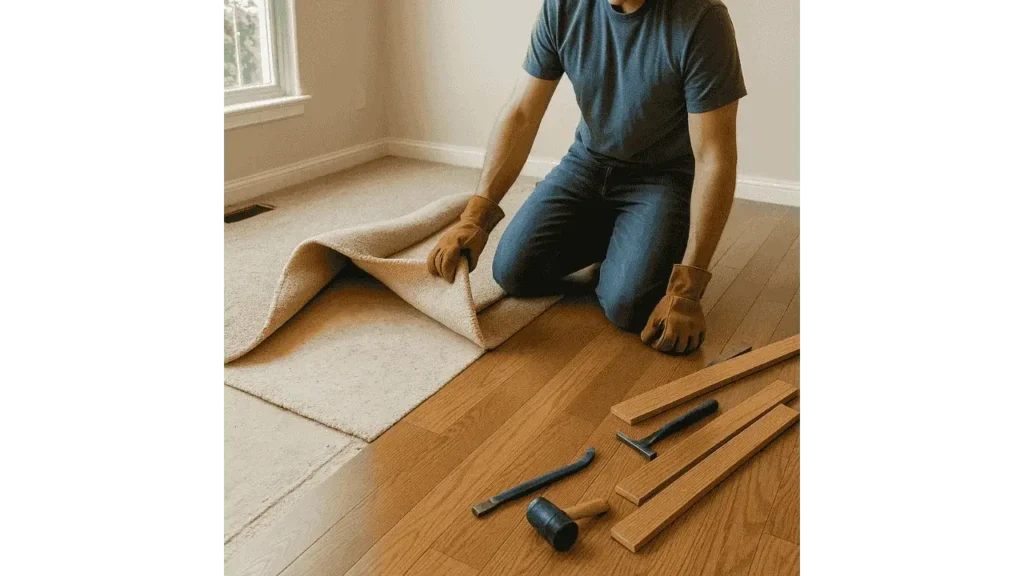
Step 1: Remove Carpets
Begin by carefully pulling up the carpet from the corners or edges of the room. Cut it into smaller strips using a utility knife to make disposal easier. Once removed, roll up the carpet and pad. Use pliers to extract any staples holding the padding and a pry bar to lift tack strips along the room’s perimeter. Be thorough, leaving behind sharp staples or tack strips could create problems later during installation.
Step 2: Remove Underlying (Unwanted) Flooring to Reveal Subfloors
Inspect the exposed floor for any layers like old vinyl, laminate, or even damaged subfloor boards. These should be removed to expose a clean and even subfloor. A floor scraper or pry bar will help lift and detach these layers. Once cleared, vacuum the surface and inspect for squeaks or weak spots. Repair any loose or damaged sections to ensure a strong and level base for the hardwood.
Step 3: Construct New Walls or Structures
If your remodeling plan includes adding or modifying walls, perhaps to change room layout or expand space, this is the point to do it. Complete all framing work before laying down the new floor. This avoids needing to cut into the hardwood later, which can ruin the flow and look of your final flooring.
Learn More: How to Seal Hardwood Floors?
Step 4: Fill Gaps with Joint Compound or Drywall Mud
After removing all old materials, you’ll likely find uneven patches or small cracks in the subfloor. Fill these gaps using joint compound or drywall mud. Once dry, sand the areas smooth so the hardwood can lay flat and stable. Skipping this step can lead to uneven floors or squeaky boards.
Step 5: Paint
Paint the room before installing hardwood to avoid accidental drips on your new flooring. Tackle walls, baseboards, and trim with a steady hand, and give the paint ample time to dry. It’s far easier to touch up paint later than it is to remove it from a wood plank.
Step 6: Lay Hardwood Underlayment
Roll out your chosen underlayment, whether foam, felt, or a vapor barrier, depending on your flooring type and climate. This underlayment helps with sound absorption and moisture resistance. Make sure it’s flat and covers the entire subfloor. Tape seams as directed by the manufacturer.
Step 7: Install Hardwood Floors
Start along the longest wall or a focal point. Lay the first row of boards with the tongue side facing the wall, using spacers to allow for expansion. Depending on the product, secure each board by nailing, stapling, or gluing. Work row by row, staggering the seams for a natural appearance. Use a tapping block to keep boards snug without damaging them.
Step 8: Install Baseboard Trim
After your flooring is in place, add baseboards to hide expansion gaps. Carefully measure and cut each piece, then nail it to the wall, not the floor, to allow the wood to expand and contract. Apply caulk to seal gaps at corners or joints for a polished look.
Final Takeaways
Replacing carpet with hardwood is a rewarding upgrade that adds both beauty and value to your home. By following each step, from proper removal and preparation to careful installation and finishing, you ensure the result is clean, durable, and professionally finished. As interior designer Melissa Connor shares,
“Even the smallest flooring upgrades can dramatically shift a room’s character and value.”
Remember, the foundation of a great floor is not just the planks, but the planning and care behind every layer underneath.