
Installing ceramic tiles on a wooden floor can enhance the durability and appearance of your space. However, proper preparation is essential to ensure the tiles adhere securely and remain crack-free over time. Without proper preparation, the natural expansion and contraction of wood due to temperature and humidity changes can cause the tiles to loosen or crack. This guide will walk you through the steps to successfully lay ceramic tiles over a wooden floor using the right materials and techniques.
Can You Tile Over the Floorboards?
Yes, you can tile over wooden floors, but direct installation onto floorboards is not recommended. Wood naturally expands and contracts with temperature and humidity changes, which can cause tiles and grout to crack. To prevent this, the wooden surface must be properly prepared with an additional supportive layer before tiling. Installing an underlayment helps absorb movement and provides a smooth, even surface for tile installation. Understanding how to prepare the surface properly ensures a long-lasting and professional finish.
Preparing Floorboards for Tiling:
Before laying tiles, it’s crucial to prepare the wooden floor to create a stable, even surface. Start by inspecting the floor for any damage. Replace loose or damaged boards and secure any squeaky or raised areas. Clean the surface thoroughly to remove dust, dirt, and grease. Sand down any uneven areas to make the surface as flat as possible. This preparation step is critical because any imperfections in the subfloor can cause tiles to crack or become uneven over time.
Learn More: Removing Old Oil Stains from Wood Floors!
Moisture is another factor to consider. Ensure the wooden subfloor is completely dry and free from moisture. Installing tiles over damp wood can lead to mold growth and adhesive failure. Use a moisture barrier if necessary, especially in moisture-prone areas like kitchens and bathrooms.
Selecting Your Underlayment:
Choosing the right underlayment is essential for a long-lasting tile installation. A cement backer board or tile backer board is the most effective option, providing a stable and moisture-resistant surface. The cement backer board is rigid and prevents the wood floor’s natural movement from affecting the tile. Alternatively, a decoupling membrane can be used to absorb movement and prevent tile cracks, especially in areas with significant foot traffic or temperature changes.
For bathrooms or kitchens where moisture exposure is higher, waterproof backer boards or specialized uncoupling membranes are recommended. These materials provide an additional layer of protection against water damage and tile shifting.
Installing the Underlayment:
Begin by cutting the cement backer board to fit the floor space. Apply thin-set mortar evenly on the wooden floor and lay the backer board on top, pressing it firmly into place. Secure the board with screws, ensuring they are flush with the surface. Stagger the seams between boards and tape the joints with fiberglass mesh tape, applying a thin layer of mortar over the tape to seal the seams. This prevents movement and ensures a secure base for the tiles.
Properly installing the underlayment not only prevents cracks but also improves the overall strength of the flooring. Take extra care in aligning and securing the boards to avoid uneven spots in the finished tile floor.
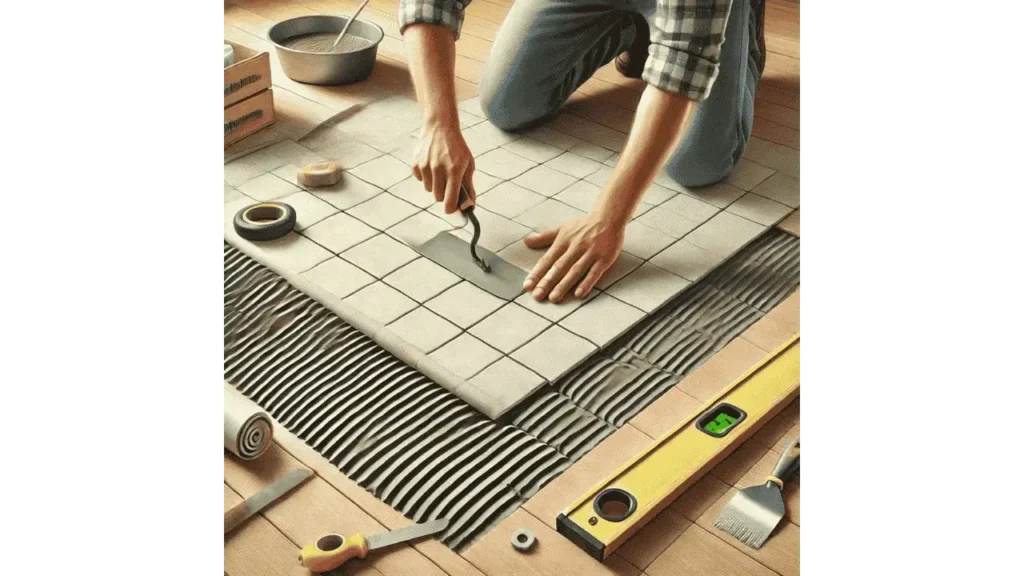
Before Laying Your Tiles:
Double-check that the underlayment is level and securely attached. Plan your tile layout by measuring and marking the center of the room to ensure even tile placement. Dry-lay the tiles first to see how they will fit in the space and to minimize awkward cuts near the edges.
Mix thin-set mortar and apply it with a notched trowel, working in small sections to prevent the mortar from drying too quickly. Press the tiles firmly into place and use spacers for consistent grout lines. Wipe away excess mortar as you go to prevent it from drying on the tiles. Allow the mortar to cure completely before applying grout, typically 24 hours or as the manufacturer recommends.
Grouting and Sealing the Tiles:
Once the mortar has fully cured, it’s time to grout the tiles. Choose a grout color that complements your tiles and apply it using a rubber float. Work the grout into the joints and wipe off excess with a damp sponge. After the grout dries, apply a grout sealer to protect it from moisture and staining. This final step adds durability and helps maintain the tile’s appearance over time.
Conclusion:
Tiling over a wooden floor requires careful preparation and the right materials to ensure a smooth and durable finish. By reinforcing the wooden surface with a proper underlayment and following the correct installation steps, you can achieve a beautiful, long-lasting ceramic tile floor. With attention to detail and quality materials, your tiled wooden floor will withstand daily use while adding style and value to your home. Proper planning, thorough preparation, and careful execution are the keys to creating a stunning and durable tile floor that will last for years.