Gluing down vinyl plank flooring is a solid choice when you want long-term durability, especially in busy areas. This method holds the floor firmly in place, making it ideal for both homes and commercial spaces. However, the success of this installation depends on how well you prepare the subfloor, handle moisture concerns, and follow the correct steps. As someone who’s worked with different vinyl systems, I can say a good glue-down job starts with a clean, level foundation and the right materials.
Acceptable Subfloors for Vinyl Plank Flooring
Wood Subfloors
Wood subfloors must be dry, stable, and free of any raised nails or loose boards. Sand any uneven spots and clean the surface thoroughly. Using a primer designed for glue-down applications can make a big difference in how well the adhesive bonds. If you skip this step, you might notice lifting or gaps in a few months.
“Properly priming wood subfloors can increase adhesive grip by up to 40%, especially in older homes,” says flooring technician Greg Daniels of SurfacePro Installers.
Concrete Subfloors
Concrete surfaces need to be smooth and moisture-free. Use a leveling compound to fix low spots or cracks. It’s essential to test for moisture with a proper meter because excess moisture will weaken the adhesive. When needed, apply a moisture barrier before starting the installation.
Learn More: Can You Paint Vinyl Floors?
Existing Flooring
You can glue vinyl planks over old flooring if it’s in good condition. The existing floor must be flat, clean, and firmly attached. Tile and laminate are usually acceptable, but anything loose, warped, or damaged should be removed. Always check with the manufacturer before gluing over another surface.
Floor Preparation
The floor must be clean and free of grease, dust, or old adhesive residues. A vacuum followed by a damp mop usually does the trick. Any dirt left behind can reduce the strength of the adhesive. Make sure the floor is completely dry before applying glue.
Test the Moisture
Excess moisture is one of the biggest reasons glue-down vinyl fails. Use a moisture meter to check levels before starting. If the reading is too high, you’ll need a vapor barrier to protect your floor. Skipping this step can lead to warping and adhesive failure.
“Moisture mitigation is the number one overlooked step in vinyl flooring installs,” warns Amanda Burke, certified flooring inspector at Burke Surfaces. “Even minimal seepage through concrete can compromise the entire adhesive layer.”
Flooring Material Inspection
Open the boxes and inspect each plank for color consistency and damage. Let the planks sit in the room for 24–48 hours to acclimate to the environment. This helps reduce expansion or contraction after installation.
Installing Vinyl Planks
Follow Manufacturer’s Instructions
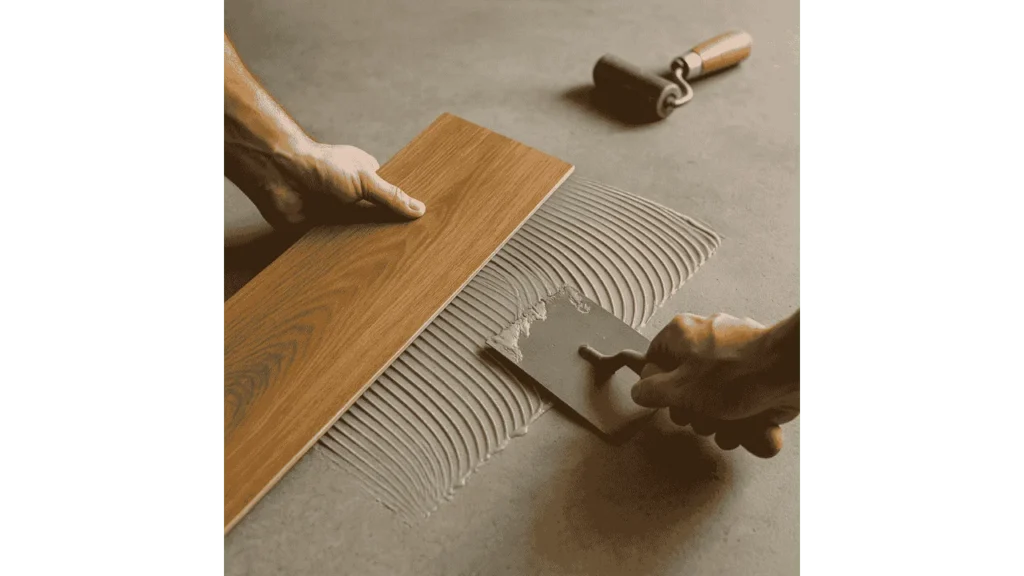
Each vinyl plank brand may have different adhesive and application methods. Always read the manufacturer’s guidelines thoroughly. Use a trowel to spread the adhesive evenly, then lay each plank carefully and press it into place. Go section by section and avoid rushing.
Roll and Set the Planks
Once a section is installed, use a 100-lb roller to press the planks down and remove air pockets. This ensures a strong bond and smooth surface. Avoid walking on the new floor for 24 hours to let the glue cure fully.
Is Glue-Down Vinyl Right for You?
Glue-down vinyl is a great choice if you’re looking for stability, especially in areas with heavy foot traffic. It’s more labor-intensive than floating floors but offers a firmer, quieter feel underfoot. If you’re prepared to do the prep work, or hire someone who is, the end result is worth the effort.
Final Takeaways
A properly glued-down vinyl floor can last for years without shifting or bubbling. The key is in the prep: test for moisture, clean the subfloor, and follow every instruction from your flooring brand. Don’t rush the process, patience now will save you costly repairs later. With the right steps and tools, you can achieve a clean, professional finish that stands up to daily use.